ACF와 구글 API 를 연동하여 지도를 표시해 보겠습니다.
우선 ACF를 사용하기 전에 ACF에 어떤 페이지에 노출 해야 할지를 지정해야 하는데 현재 우리는 따로 페이지를 만들지 않고 index.php 파일로만 진행을 했기 때문에 index 라는 페이지를 관리자 > 페이지 화면에 추가해 보도록 하겠습니다.
기본으로 저장되어 있는 ‘안녕하세요’ 페이지는 삭제 하고 새 페이지 추가 작업을 통해 제목을 index 라고 지정하고 저장합니다.
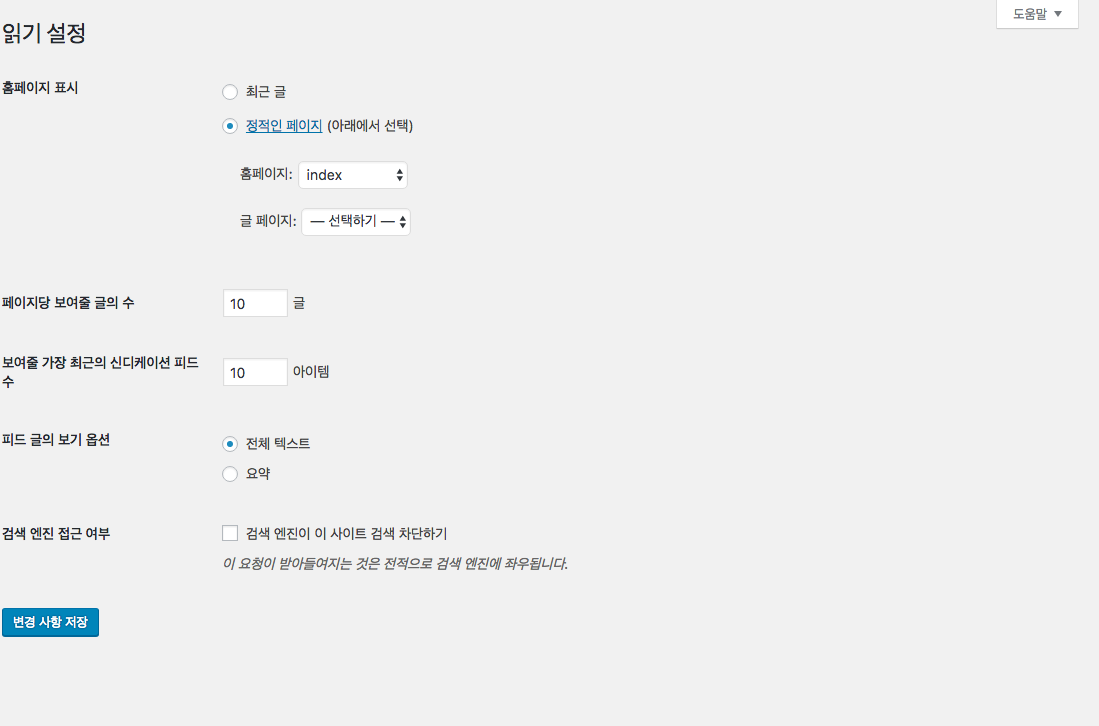
이후 설정 -> 읽기 화면에서 아래와 같이 세팅하고 저정합니다.
- 페이지 > 안녕하세요 페이지 삭제
- 페이지 > 새 페이지 추가 > 제목은 ‘index’
- 설정 > 읽기 화면 에서 홈페이지를 정적인 페이지 > index로 설정 후 저장
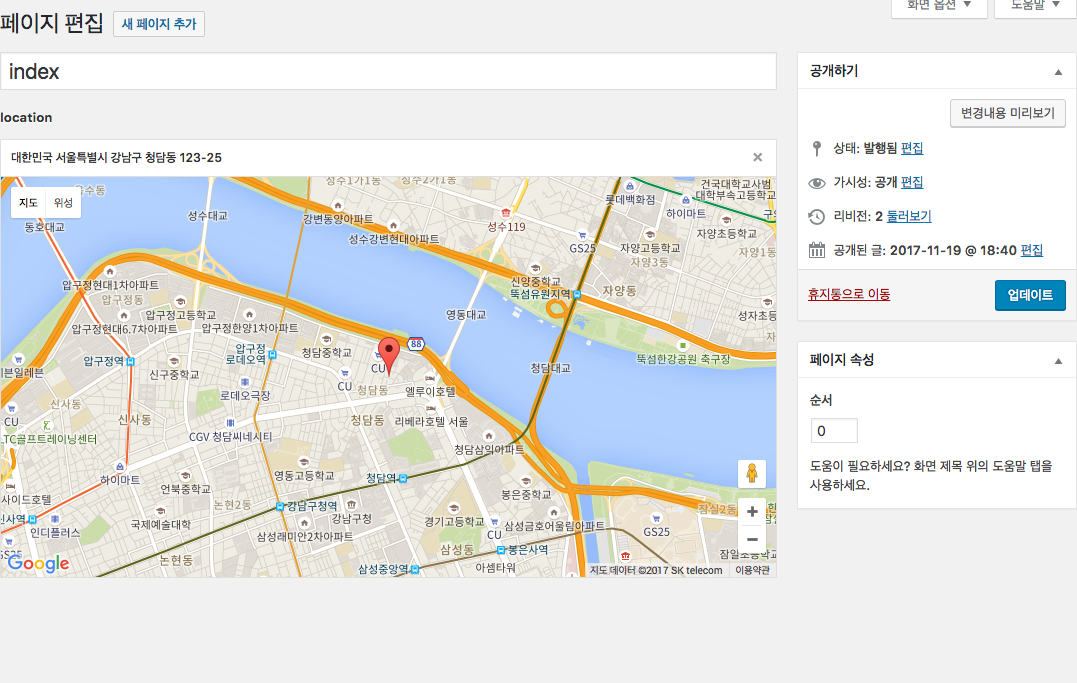
이제 ACF 에 index 화단에 노출될 지도에 대한 세팅을 저장하겠습니다.
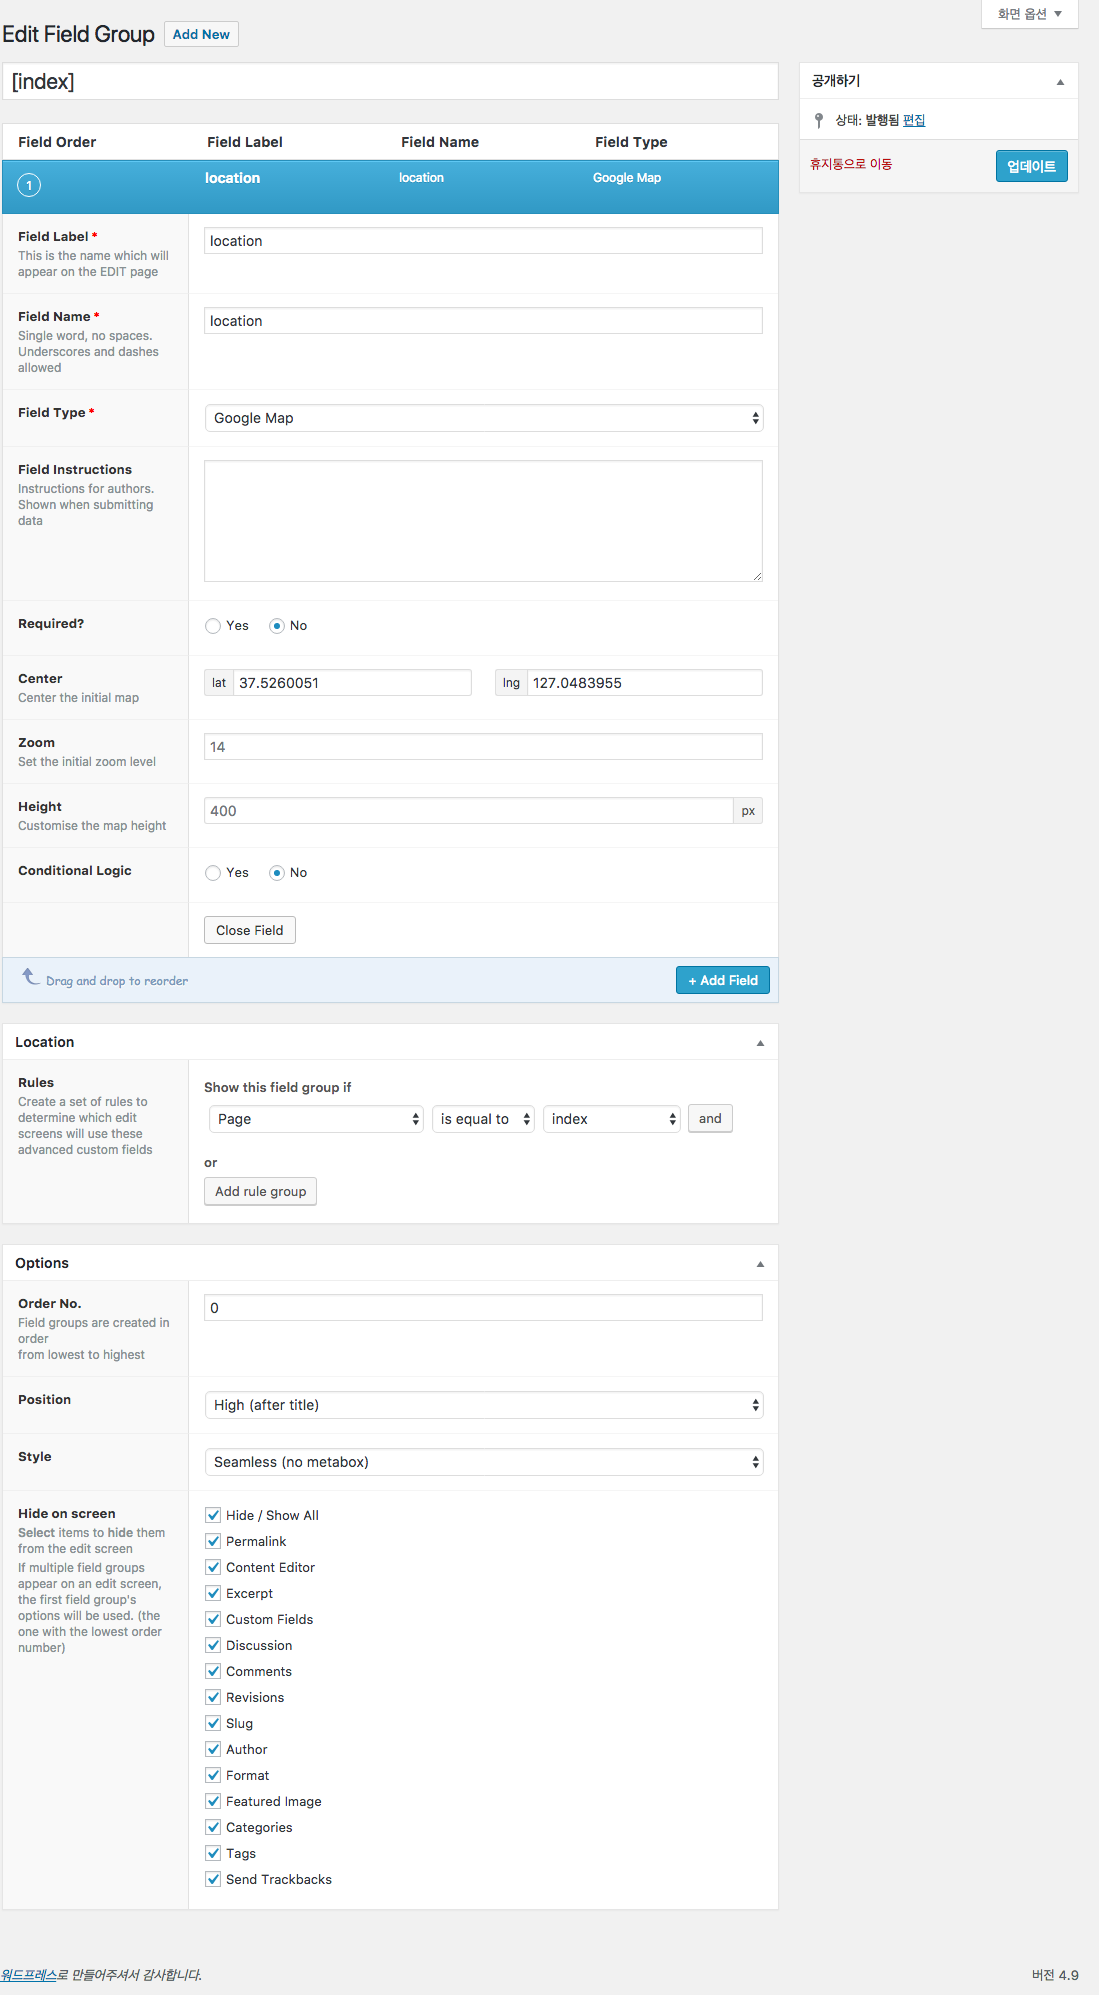
위와 같이 세팅을 해주고 저장합니다.
index 화면은 필요에 따라 다른 ACF 관련해서 저장하고 수정할 수 있습니다.
지금은 지도를 삽입하는 과정이고 이 외에 GOAL 숫자 관련된 부분을 넣거나 ABOUT US 관련된 부분도 index 페이지에 custom fields 로 저장하고 쉽게 관리할 수 있습니다.
이제 다시 페이지 > index 페이지로 들어가면 지도 화면에 노출이 되는데 아래와 같은 오류 화면 나오는 것이 정상입니다.
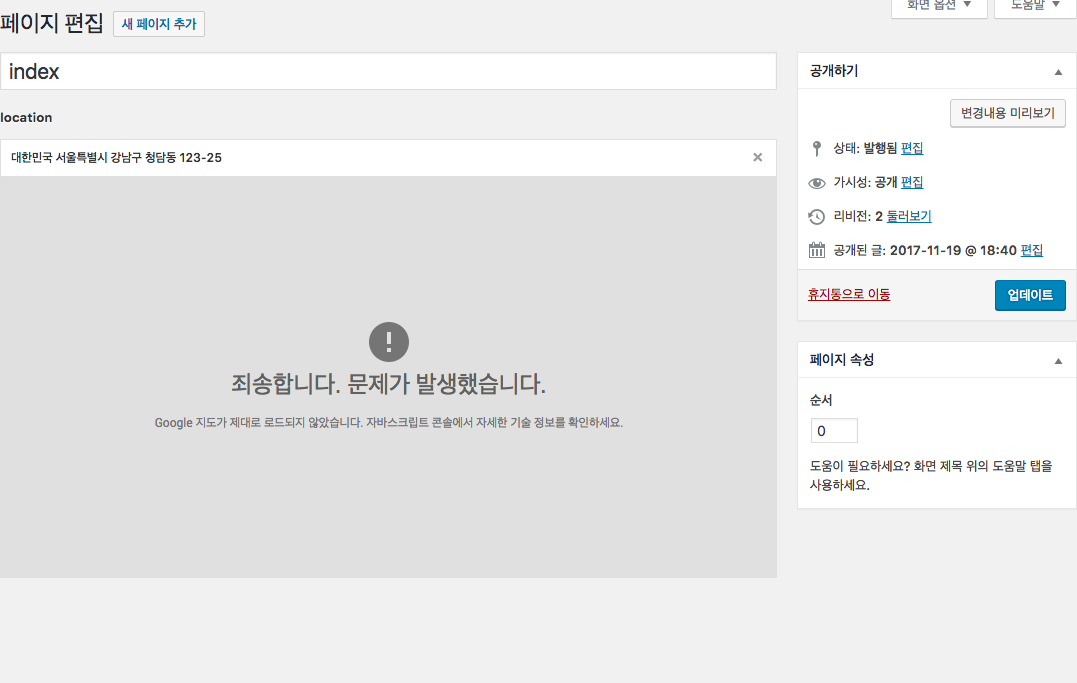
지도 관련된 구글 API 관련 정보를 입력 하여야 지도가 정상적으로 노출이 되는데 ACF의 Google Map API 페이지와 구글지도 API 키 발급 받는 방법등 구글 검색을 통해 구글 API를 발급 받을 수 있습니다.
구글 API를 발급 받았다면
functins.php
// acf google map api
add_filter('acf/fields/google_map/api', 'zeein_acf_google_map_api');
function zeein_acf_google_map_api( $api ){
	$api['key'] = '구글 API 에서 발급 받은 키 값';
	return $api;
}
위와 같이 입력 해주고 저장합니다.
index.php
            <?php
                $location = get_field('location');
                if ( !empty($location) ) :
            ?>
            <div class="eff-cross"></div>
            <div class="acf-map">
                <div class="marker" data-lat="<?php echo $location['lat']; ?>" data-lng="<?php echo $location['lng']; ?>"></div>
            </div>
            <?php endif; ?>
        </section>
    </main><!-- #main.site-main -->
</div><!-- #prmary.content-area -->

<!-- acf google map -->
<script src="https://maps.googleapis.com/maps/api/js?key=구글 API 에서 발급 받은 키 값"></script>
<script type='text/javascript' src='<?php echo bloginfo('template_url');?>/assets/js/acf-google-map.js'></script>
위와 같이 저장 후 테마 폴더에 zeein-yello > assets > js > acf-google-map.js 파일을 생성하고 아래의 내용을 그대로 붙혀넣기 하고 저장합니다.
acf-google-map.js
(function($) {

    /*
    *  new_map
    *
    *  This function will render a Google Map onto the selected jQuery element
    *
    *  @type	function
    *  @date	8/11/2013
    *  @since	4.3.0
    *
    *  @param	$el (jQuery element)
    *  @return	n/a
    */

    function new_map( $el ) {

        // var
        var $markers = $el.find('.marker');


        // vars
        var args = {
            zoom		: 10,
            center		: new google.maps.LatLng(0, 0),
            mapTypeId	: google.maps.MapTypeId.ROADMAP
        };


        // create map
        var map = new google.maps.Map( $el[0], args);


        // add a markers reference
        map.markers = [];


        // add markers
        $markers.each(function(){

            add_marker( $(this), map );

        });


        // center map
        center_map( map );


        // return
        return map;

    }

    /*
    *  add_marker
    *
    *  This function will add a marker to the selected Google Map
    *
    *  @type	function
    *  @date	8/11/2013
    *  @since	4.3.0
    *
    *  @param	$marker (jQuery element)
    *  @param	map (Google Map object)
    *  @return	n/a
    */

    function add_marker( $marker, map ) {

        // var
        var latlng = new google.maps.LatLng( $marker.attr('data-lat'), $marker.attr('data-lng') );

        // create marker
        var marker = new google.maps.Marker({
            position	: latlng,
            map			: map
        });

        // add to array
        map.markers.push( marker );

        // if marker contains HTML, add it to an infoWindow
        if( $marker.html() )
        {
            // create info window
            var infowindow = new google.maps.InfoWindow({
                content		: $marker.html()
            });

            // show info window when marker is clicked
            google.maps.event.addListener(marker, 'click', function() {

                infowindow.open( map, marker );

            });
        }

    }

    /*
    *  center_map
    *
    *  This function will center the map, showing all markers attached to this map
    *
    *  @type	function
    *  @date	8/11/2013
    *  @since	4.3.0
    *
    *  @param	map (Google Map object)
    *  @return	n/a
    */

    function center_map( map ) {

        // vars
        var bounds = new google.maps.LatLngBounds();

        // loop through all markers and create bounds
        $.each( map.markers, function( i, marker ){

            var latlng = new google.maps.LatLng( marker.position.lat(), marker.position.lng() );

            bounds.extend( latlng );

        });

        // only 1 marker?
        if( map.markers.length == 1 )
        {
            // set center of map
            map.setCenter( bounds.getCenter() );
            map.setZoom( 16 );
        }
        else
        {
            // fit to bounds
            map.fitBounds( bounds );
        }

    }

    /*
    *  document ready
    *
    *  This function will render each map when the document is ready (page has loaded)
    *
    *  @type	function
    *  @date	8/11/2013
    *  @since	5.0.0
    *
    *  @param	n/a
    *  @return	n/a
    */
    // global var
    var map = null;

    $(document).ready(function(){

        $('.acf-map').each(function(){

            // create map
            map = new_map( $(this) );

        });

    });

})(jQuery);
이제 main.css 파일에 지도 관련 css 파일만 추가 해주면 지도가 노출 됩니다.
main.css
/* google map */
.eff-cross {
    position: relative;
    top: 40px;
    width: 0;
    height: 0;
    border-left: 50vw solid transparent;
    border-right: 50vw solid transparent;
    border-top: 40px solid #FBD04B;
    margin: 0 auto;
    z-index: 10;
}

.acf-map {
	width: 100%;
	height: 500px;
	border: none;
    margin: 0;
    opacity: 0.95;
    filter: grayscale(0.9);
}

/* fixes potential theme css conflict */
.acf-map img {
   max-width: inherit !important;
}
607: 지도 노출되는 height 값을 수정할 수 있습니다.
이제 다시 관리자 화면 페이지 > index 페이지와 메인 화면을 새로 고침 하면 지도가 정상적으로 기본 값으로 출력이 되는데 자신이 원하는 주소를 입력하고 저장해 주면 사이트에 바로 적용이 됩니다.